Welding aluminum boats is not as easy as it sounds. I can be a more technical and tricky than welding a simple aluminum structure.
Most quality aluminum boat makers use 5000 series aluminum in their designs. 5000 series alloy contains both aluminum and magnesium (and potentially manganese), which defend strongly against corrosion in marine environments. Since aluminum has an oxide layer (which can be thick on a well-used boat), this can pose some challenges for welding.
Below we cover the 7 steps on how to weld aluminum boats. But before that, let’s cover some of the basics:
Can An Aluminum Boat Be Welded?
Yes, aluminum boats can be welded but not with a traditional stick welder. An advanced TIG (Tungsten Inert Gas) or MIG (Metal Inert Gas ) welder is required to weld aluminum boats.
The 5000 series aluminum / mangesium alloy used in quality aluminum boats is heavily coated. A lot of heat, the correct gas mixture, and the right filler rod or wire are needed to ensure strong welds that won’t crack or leak.
What Welding Method Is Best For an Aluminum Boat?
The two welding methods that work best with aluminum are TIG (Tungsten Insert Gas) and MIG (Metal Insert Gas) welding.
It’s essential to use the right gas for both TIG and MIG welding of 5000 series aluminum / magnesium alloy. Argon is ideal, as it facilitates cleaning the weld of any impurities. Helium can also be used, although it does not keep the weld as clean, and is more expensive than argon.
NEVER use oxygen or C02 gas for welding an aluminum boat. The addition of oxygen into a highly heated environment will cause the weld and surrounding metal to oxidize and become brittle — exactly the opposite of what you need!
TIG Welding Aluminum
Welding aluminum boats is best done with Gas Tungsten Arc Welding (GTAW or TIG) to give the best weld quality. TIG welding is ideal for the 5000 series aluminum / magnesium alloy used in most aluminum boats.
To TIG weld a boat you will need balled tungsten, pure argon or argon/helium gas and ER5356 filler rod.
It’s essential to use the right filler rod for welding an aluminum boat. A high magnesium content filler rod such as 5356 (5% magnesium) will reduce the tendency for welds on 5052 aluminum / magnesium alloy to crack. 5183 and 5556 filler rods are also commonly used.
MIG Welding Aluminum
To weld aluminum with MIG you will need a spool gun, pure argon gas and ER5356 filler wire for 5000 series aluminum alloy.
MIG uses self-feeding metal wire from a handheld spool gun instead of a tungsten elecrode and filler rod.
The downside of MIG as it can be somewhat less precise, since the spool gun’s speed isn’t as sensitive as TIG’s handheld filler rod. This can be a drawback with welding aluminum, since you need to move quickly at high heat settings but still control the weld pool. Having the extra sensitivity and control of holding a filler rod, rather than having a gun feed the wire at a constant speed, is very helpful.
How to Weld An Aluminum Boat In 7 Steps
Here are the 7 steps for how to weld an aluminum boat. We have focused here on TIG Welding, because it’s the best method for series 5000 aluminum alloy used on boats.
Step 1: Prepare Your Tools and Safety Gear
Here are the tools you will need to weld the aluminum boat. You can click through the list to find good products on Amazon if you need something.
As an Amazon Associate, SelectSafety earns commissions from qualifying purchases made through links in this post.
- Safety glasses
- Brass brush
- Angle grinder
- 4 1/2″ flap discs for sanding
- 4 1/2″ stripping discs for removing oxidation and smoothing
- Metal files
- Welding helmet (see our Best Auto-Darkening Welding Helmets guide)
- Leather welding gloves
- TIG or MIG welder (see our Best Welders for Aluminum guide)
- Argon or argon/helium gas
- ER5356 TIG filler rods or ER5356 MIG wire
Step 2: Set Up The Machine
Once you are ready with the welding tools and safety gear, it is time to set up the machine.
Consult with a TIG settings chart for aluminum like this one for the right tungsten and amperage settings.
Set your welding machine in AC mode as it is required for TIG welding. AC mode is used for high-frequency power delivery as more heat is typically needed for aluminum alloy welding on a boat.
Step 3: Ball the Tungsten
If you’re using a TIG welder it’s essential to ball the tungsten before starting your welds on an aluminum boat. It takes a few simple steps and only 2-3 minutes. Aluminum requires very high heat to achieve a solid weld, and the ball facilitates high heat transfer.
There are various types of tungsten electrodes. Previously with pure tungsten, it was absolutely essential to ball the end of the electrode to get the heat to transfer to the welded surfaces and filler rod quickly. However, nowadays, depending on the type and shape of tungsten electrode you’re using, it may be less critical to ball the tip.
This video explains more about balling tungstens:
One thing to keep in mind is certain tungsten electrodes can be radioactive, and sharpening them can release radioactive dust that is extremely harmful to your health. This is the case with thoriated tungsten electrodes. It’s best to purchase pre-sharpened thoriated tungsten electrodes for this reason.
Step 4: Clean Up the Surface
Now it is time to use your angle grinder with a flap wheel or stripper disc and your brass brush to clean up the welding surface of oxidation, dirt and grime. Remember, aluminum oxidizes faster than other metals under high heat situations.
It’s essential brush the area immediately before you start your welds. Any significant delay before welding will allow oxidation to build up again.
You also need to brush the area again after you lay down a weld if you’re planning to continue it or start a new bead in close proximity to the first weld. Oxidation can quickly build up around welds, so brushing it away with your brass brush is important to ensure high weld strength and reduce cracking.
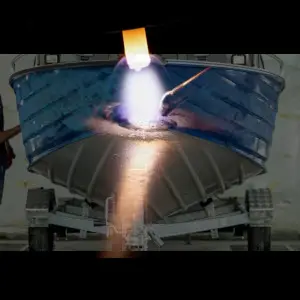
Step 5: Start Welding
Now that everything is prepped, don your welding gloves and welding helmet and start your aluminum boat weld.
Aluminum alloys used on boats can be tricky to weld. It pays to practice repeatedly on scraps of the same type and thickness of metal before committing to the work.
Keep in mind; aluminum absorbs heat faster, so moving quickly on high heat setting is critical. Moving too slowly can melt the surface, warp the aluminum or punch a hole through it instead of joining it together.
Using the filler rod to add more material at the welding point will help prevent melting or warping the base metal too much. It can help to reduce the heat with a wet rag or flow of compressed air as you go. This will reduce warping on thin boat hull and cabin panels.
Step 6: Finish and Polish Your Aluminum Boat Weld
Your weld is done! Now it’s time to finish and polish the area.
To finish the weld area, start off with a flap disc to clean up any sloppy welds or spatters. Then switch to a Scotch wheel or similar. You can then work down from 400 to 600 grit sandpaper (wet).
Finally use a marine aluminum polish to bring the area to a sheen and blend it in.
As you finish and polish your aluminum boat weld, keep a close eye for any potential holes or leaks in and around the weld area. If necessary, spot weld them closed and refinish.
The Do’s and Don’ts of Aluminum Boat Welding
In our coverage of the 7 steps for how to weld an aluminum boat, there are some key Do’s and Don’ts you need to keep in mind.
Do’s:
- ALWAYS keep the surface clean no matter how much time it takes. Otherwise, you will be left with weak, oxidized, porous welds that appear greyish-black, instead of shiny aluminum.
- ALWAYS brush the aluminum welding surface immediately before you start welding; otherwise, the surface will oxidize before you can lay down your weld.
- ALWAYS use solvent such as acetone to clean away any oil and grease before getting started. This is especially important when fixing used boats.
Don’ts:
- DO NOT cut the aluminum with a grinder machine as it damages the edges and leaves imperfections that lead to porosity.
- NEVER use oxygen or CO2 shielding gas as this will cause high oxidation and weak / brittle welds. ALWAYS use argon or helium only.
- NEVER weld aluminum without shielding gas. Traditional flux core stick welding and flux core wire MIG welding cannot be used to weld aluminum effectively.
- NEVER use a greasy rag to clean the surface.
- DO NOT use compressed air to clean the aluminum before welding (using it to cool the surface after is OK). Compressed air can leave surface moisture, which can reduce the stability of the weld arc.
TIG vs MIG For Welding Aluminum Boats?
You can read more about MIG vs TIG here if you’re interested. This video also provides a good overview.
NEXT UP: 7 Flux-Core Welding Tips